OMG where can I collect my beautiful jewelry except boxes? Surely in a jewelry stand! Is there something like that for tunnels and plugs? No sorry, not really! DAMN why?!
I was searching a loooong time for a practically and good looking solution for my plugs and tunnels and found totally nothing! No displays, no stands, nothing for daily using. Than I thought about it and made something myself. I ́m still a bit confused that it comes out so well 🙂 and maybe you like mine and make one yourself with my DIY.
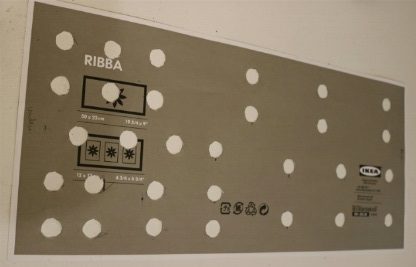
The wooden frame was a chance find one a second hand shop for 2€, but you will also find this one or a similar one at your local Ikea store. This one works very well, because it ́s very deep and we need the depths later for the foam (foam = plastazote).
Now you need a piece of paper and a pencil to make a template, or you use the paper back that ́s included in the frame (that one works well, because it has already the perfect size we need, otherwise you have to cut a piece of paper to the correct size). The glass (or plastic) is only needed to transfer the size easily tothe plastazote.
You need color! Make a choice! I preferred spray paint to avoid brush strokes and recommend the graffiti colors of Montana Gold. I used the color copperchrome formine (which I also use for my Hermes Cosplay -> watch here!) and the wood primer for the base. At the end I seal everything with a clear coat in silk mat (you can buy this stuff @stylefile.de).
Why Montana GOLD and not Montana BLACK? And why graffiti colors and not the spray paint from my local building store?Because they are much cheaper and have much more pigments (special thanks to LightningCosplay, who gave this tip in one of her workshops!). Additionally there ́s much more content in it!
The BLACK cans work like the building store spray paints with high pressure, which means that a lot of color comes very fast out of it. The GOLD cans work with low pressure and cause of that, they are much easier to control. Although you ́ve more time and less color waste. Pls note, that it REALLY makes sense to shake the cans the given time, only than you can avoid splashes on your stuff. (Same thing for EVERY spray paint in a can!)
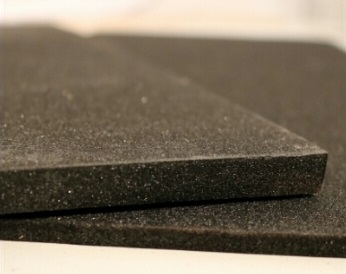
You additionally need some foam, I bought plastazote in 5+10mm (@mycostumes.de), contact glue or hot glue.

Moreover you need a dremel with sanding bit (only useful for sizes above 7mm or15mm) or a small sharp exacto knife or cutter knife and small nails (e.g. leftover from Ikea racks) plus a hammer.
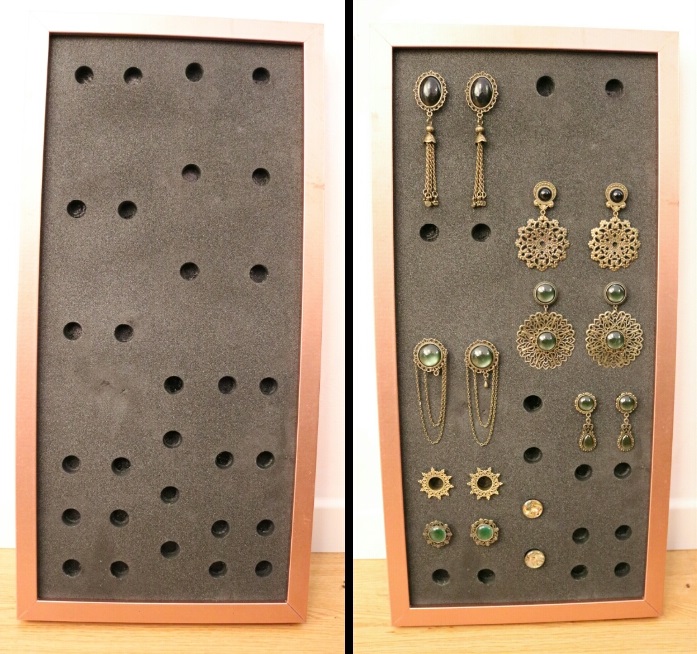
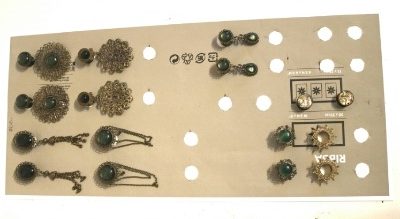
Let ́s get it on! Position your plugs and tunnels that you want to storage in the stand on the paper. Don ́t forget that the frame will cover a bit! You can position them symmetric or not, like you want to. Draw your positions on and think about the distances your jewelry MUST have (for hangers or big frames or something) and should have. Then you draw circles on the positions, similar to your diameter, but a little bit smaller.
At the same time you can start to spray paint the frame, as it can dry while you working on everything else >> first primer (for wood), then color, then clear coat. Meanwhile the primer, color,… have to dry app. 30minutes. You can also make the color last longer if you sand the frame with a fine sand paper before you prime it, but remove the dust very well at the end.

For the correct size of the plastazote, position the glass on it and use chalk or a pen to redraw the shape (or cut it out directly on the edge with the cutter knife). Now lay the template on the 10mm plastazote and transfer the circles on it (better use chalk than a pen, as you can remove the chalk easily) and cut them out through the full depth. The ones that have a dremel, use it with a sanding bit and push it vertical through the foam. Two more hands are helpful to hold the foam in place :). My diameter is 16mm and the normal sized sanding tip works perfect for that. When you put on the sand bit, let the edge stand over a bit on the holder and accelerate. There ́s a smaller base and smaller sanding bit (7,2mm) that can be used for smaller diameters. If you need a whole above 7mm or 15mm, you can also use this bits, but for smaller or very big sizes, I would prefer an exacto knife (maybe eyelet punches are an option for very small sizes?).

So we have the holes in the Plastazote now and need the back layer then, therefore we glue both pieces of plastazote together. I was a bit uncertain in this point and brush the contact cement on the 5mm plastazote, but it is definitely smarter, to add the glue on the 1cm plastazote to avoid visible glue in the holes. Pls take care to brush on the glue around the holes carefully to avoid nasty marks and press the two pieces together. When everything is dried, lay the foam into the colored frame (holes visible at front) and press the wooden back piece against it from the backside. Fix the back plate with the small nails and pound it into the frame carefully.
Push your plugs and tunnels into the holes, FINISHED! If you want to, you can hang the frame on the wall, it ́s still possible!
The awesome jewelry with the black and green stones you see in my frame is made by rebecca-steel, the abalone plugs are from crazy-factory and the golden mandala tunnel are from chic-net.
OMG wohin mit meinem schönen Schmuck? Natürlich in einen Schmuckständer! Gibt ́s da was für Tunnel und Plugs (oder von Ratiopharm)? Ähm, nein nicht wirklich! Menno!
Ich habe sehr lange nach einer praktischen Lösung für meine Plugs und Tunnel gesucht und rein gar nichts gefunden! Keine Displays, Aufsteller, nichts, das für den Hausgebrauch geeignet wäre.
Dann habe ich mir einfach ein paar Gedanken gemacht und selber was Schönes gebaut. Ich bin selber etwas baff, dass es so gut geworden ist. Vlt gefällt es euch ja auch und habt durch meine Idee und Umsetzung Lust, selber etwas zu basteln ☺.
Den Ikea-Holzrahmen mit Rückplatte habe ich für 2€ zufällig in einem Second Hand Laden gefunden, aber die kosten ja auch neu nicht viel. Einfach eine Form aussuchen, die euch gefällt und genug Platz bietet! Dann braucht ihr noch Papier & Bleistift für eine Schablone, könnt aber auch das Papier dafür verwenden, das eh im Rahmen drin ist (bei Ikea ist da immer eins mit drin, das genau zum Rahmen passt, sonst müsst ihr euch etwas in der Größe zuschneiden). Das Glas braucht ihr nur noch, um nachher die richtige Größe auf die Plastazote zu übertragen.
Aber Farbe braucht ihr noch! Und zwar die eurer Wahl! Am besten Sprühfarbe, damit es keine sichtbaren Pinselstriche gibt. Ich empfehle die Graffitifarben von Montana Gold und habe selber Farbe Copperchrome verwendet (mein Hermes ist auch mit dieser Farbe besprüht, mehr davon siehst du hier) mit dem Holzprimer als Basis. Am Ende habe ich den Rahmen noch mit Klarlack versiegelt, am besten seidenmatt (gibt es alles z.B. bei stylefile.de).
Warum Montana GOLD und nicht Montana BLACK? Und warum Graffiti-Farben und nicht die aus dem Baumarkt?
Weil Sie viel günstiger sind als die Farben im Baumarkt und meistens auch viel höher pigmentiert (übrigens meinen Dank an LightningCosplay für den tollen Tipp!). Außerdem ist noch deutlich mehr drin! Die Black-Dosen funktionieren wie die Dosen im Baumarkt mit Hochdruck, d.h. es kommt schnell und viel Farbe rausgeschossen. Die Gold-Dosen funktionieren mit Niedrigdruck und sind somit viel leichter zu kontrollieren. Man kann sich einfach mehr Zeit lassen und verschleudert nicht so viel Farbe. Mein zusätzlicher Tipp: Nehmt euch wirklich die angegebene Zeit die Dosen zu schütteln, nur dann tropft nichts! Das gilt übrigens für alle Dosen.
Dann braucht ihr noch einen Schaumstoff, ich habe Plastazote in 5+10mm (von mycostumes.de) verwendet, Kontaktkleber oder Heißkleber.
Außerdem einen Dremel mit Schleifaufsatz (nur bei bestimmten Größen geeignet), oder alternativ ein kleines scharfes Bastel- oder Cutter Messer und kleine Nägelchen (wie sie schon mal von den Ikearegalen über bleiben) plus einen Hammer.
Nun geht ́s los. Positioniert eure Plugs und Tunnel die ihr unterbringen wollt auf dem Papier für die Schablone, Achtung! Nicht vergessen, dass ihr einen Rand habt, welcher den Schaumstoff im Rahmen hält und der ausgespart werden muss. Ihr könnt symmetrisch oder unsymmetrisch arbeiten, wie es euch gefällt. Zeichnet eure Positionen ein, denkt an Abstände, wenn euer Schmuck ggf. Hänger hat. Anschließend zeichnet ihr den Umfang des Plugs auf, etwas kleiner als er ist, und schneidet die Kreise aus dem Papier aus.
Zeitgleich kann man auch schon den Rahmen anfangen zu besprühen, dann kanndieser zwischendurch trocknen => Erst Primer (für Holz), dann Farbe, dann Klarlack. Zwischendurch müssen die Farben lt. Angabe ca. 30min. trocknen. Wer sich noch etwas mehr Mühe für die Haltbarkeit der Farbe machen möchte, kann den Rahmen mit feinem Schleifpapier etwas anschleifen (vor dem Primer!), dann danach aber gut abstauben.
Für die richtige Größe der Plastazotestücke könnt ihr das Glas auflegen und umzeichnen (oder direkt mit dem Cutter Messer an der Kante entlangschneiden).Nun legt ihr die Schablone auf die 10mm Plastazote auf, und zeichnet die Kreise mit Kreide nach und schneidet diese dann durch die komplette Tiefe aus. Wer mit einem Dremel arbeitet, kann auch vorsichtig direkt durch die Löcher dremeln, dann empfiehlt sich jedoch die Hilfe durch zwei weitere Hände um die Schablone festzuhalten :). Meine Ohrlöcher sind 16mm groß und ich habe den normal großen feinen Schleifaufsatz benutzt, hat perfekt gepasst. Den Aufsatz auf der Halterung etwas vorstehen lassen und ordentlich Gas geben. Es gibt auch einen kleineren Schleifaufsatz, den man für kleinere Größen (schätze vlt so ab 8mm) nutzen kann. Wenn man ein etwas größeres Loch braucht, kann man mit den Aufsätzen einfach etwas mehr ausfräsen. Für kleinere Größen, oder sehr große Größen, würde ich eher ein Bastelmesser mit kleinem Messeraufsatz benutzen.
Die Löcher sind drin, jetzt brauchen wir noch eine Rückwand. Wir kleben also die beiden Plastazotestücke aufeinander. Hier war ich etwas unschlau und habe den Kontaktkleber auf die 5mm Plastazote gepinselt, was natürlich blöd ist, weil man den Kleber dann durch die Löcher der 10mm Plastazote sieht. Also bitte das andere Stück auf der Rückseite bepinselt, um die Löcher herum sauber arbeiten. Beide Stücke aufeinander kleben. Wenn alles getrocknet ist, die Plastazote in den fertig besprühten Rahmen legen und die Rückwand auflegen. Die Rückwand mit den kleinen Nägelchen fixieren, vorsichtig mit einem Hammer einschlagen.Plugs und Tunnel in die Löcher stecken, FERTIG!
Auf Wunsch kann man den Rahmen natürlich immer noch an die Wand hängen :).
Der tolle Schmuck mit den grünen und schwarzen Schmucksteinen ist übrigens von Rebecca-Steel, die Perlmuttplugs sind von crazy-factory und die goldenen Mandala-Tunnel sind von chic-net.
No Comments